Introduction to the quickstart
The following quickstart intends to implement a ng6workflow which will filter
reads using fastq_illumina_filter.
The workflow will also run fastqc after filtering. Two analyses with two templates will be created:
QIlluminaFilterwill be the analysis used to run thefastq_illumina_filterbinary. Its template will present the number of sequence before and after filtering.QFastQCwhich will execute thefastqcbinary on filtered FASTQ files coming fromQIlluminaFilter. The template fileQFastQC.tplwill present some of the generated charts of fastqc.
A NG6Workflow will be created to link those analyses together.
Step #1 create the folder tree
The first thing to do before implementing the analyses and the NG6Workflow, is to create the folder tree.
A ng6workflow is a Python package defined by a folder with a __init__.py file.
Within NG6 sources, add a package named quickstart and within this package create an other package named components (with __init__.py inside)
where all the analyses and components specific to quickstart will be stored. Note that if the analysis is shared by multiple workflows, you should
add it in the workflows/components/ folder. The template files for the visualization will be created in ui/nG6/pi1/analyses/.
These templates can have associated javascript files that must be created in the same directory.
The list of files that have to be created are :
qfastqc.pyinworkflows/quickstart/components/for thefastqcanalysis.QFastQC.tplinui/nG6/pi1/analyses/for thefastqctemplate.qilluminafilter.pyinworkflows/quickstart/components/for thefastq_illumina_filteranalysis.QIlluminaFilter.tplinui/nG6/pi1/analyses/for thefastq_illumina_filtertemplate.
You should obtained the following folder tree:
ng6/
├── bin/
├── docs/
├── src/
├── ui/
│   └── nG6/
│       └── pi1/
│           └── analyses/
│               ├── QIlluminaFilter.tpl [ QIlluminaFilter template file ]
│               └── QFastQC.tpl         [ QFastQC template file ]
├── workflows/
│   ├── components/
│   │   ├── __init__.py             [ empty __init__.py file  to make this directory a package ]
│   ├── extparsers/
│   ├── quickstart/                 [ the folder quickstart ]
│   │   ├── components/             [ the folder components where the analysis will be]
│   │   │   ├── __init__.py         [ empty __init__.py file to make this directory a package ]
│   │   │   ├── qfastqc.py          [ empty qfastqc.py file for the QFastQC anaysis ]
│   │   │   ├── qilluminafilter.py  [ empty qilluminafilter.py file for the QIlluminaFilter anaysis ]
│   │   ├── __init__.py             [ empty __init__.py file for the ng6workflow definition ]
│   ├── __init__.py
│   ├── formats.py
│   └── types.py
├── applications.properties
└── README
Step #2 Create QilluminaFilter analysis
An analysis in NG6 consist of two files :
- a
Pythonclass that will contain the process of the analysis and define wich information should be presented in the interface - a template file, named exactly as the python class name, which is a smarty template that will present the results
The Python class must inherit ng6.analysis.Analysis. While writting the Analysis, several methods must be overloaded:
define_parameters()which will describe the inputs, outputs and arguments of the analysis.define_analysis()which is used to describe the analysis.get_version()to return the version of this analysis.process()to define the command line to be executed.post_process()to make add results to the database.
First a Python file qilluminafilter.py will be written for the analysis, and then the template file associated with this
analysis will be created.
QilluminaFilter analysis
The version of Illumina's CASAVA pipeline (Version 1.8) produces FASTQ files with both reads that pass filtering and reads that don't.
The new READ-ID contains many new fields, one of them indicates whether the read is filtered or not. The fastq_illumina_filter program can
filter FASTQ files produced by CASAVA 1.8, and keep/discard reads based on this filter flag.
The command line that will be executed with fastq_illumina_filter looks like:
fastq_illumina_filter --keep [Y/N] -v -o output_filtered.fastq input.fastq > input.stdout
Where --keep option tells which type of read must be keeped (N for reads which pass the filter and Y with read which do not pass the filter),
-v allows to print a repport in STDOUT, -o specify the filtered output FASTQ file. > input.stdout allows to
redirect the output of -v option to a file, this output contains information abound the number of initial and filtered sequences.
Splitting the command line will give the following parameters, input and outputs:
keepwhich will tells which type of reads whould be keeped.output_filteredwhich is the filtered output FASTQ files.inputwhich is the FASTQ files used as input file.stdoutwhich will be the file containing information generated using-voption.
All those parameters must be added in define_parameters() method as following:
from ng6.analysis import Analysis

class QIlluminaFilter (Analysis):

    def define_parameters(self, input_fastqs, keep="N"):
        self.add_parameter( "keep", "keep option for fastq_illumina_filter",
            default=keep, choices=["N", "Y"])
        self.add_input_file_list( "input_fastqs", "Input fastq files",
            default=input_fastqs, required=True, file_format = 'fastq')
        self.add_output_file_list( "fastq_files_filtered", "fastq_files_filtered",
            pattern='{basename}', items=self.input_fastqs, file_format = 'fastq')
        self.add_output_file_list( "stdout", "stdout",
            pattern='{basename_woext}.stdout', items=self.input_fastqs)
Using those parameters definition will lead to this command structure:
fastq_illumina_filter --keep [keep] -v -o [output_filtered] [input] > [stdout]Since fastq_illumina_filter can only process unziped FASTQ files, the command structure is a little different for gziped FASTQ files:
gunzip -c [input] | fastq_illumina_filter -v --keep [keep] 2> [stdout] | gzip > [output_filtered]
In the following, this structure will be used to help us to build the command line. To build a command line, NG6 provides a
function named ShellFunction in which the command line structure can be given (nb: there is other functions available as
the PythonFunction to run an internal function). The ShellFunction takes 2 arguments: the command line
structure, wich is required, and the cmd_format defining the parameter ordering.
Considering cmd_format="{EXE} {IN} {OUT}", which is a classic value for this option, NG6 will consider the following
inputs and outputs order: input_fastqs, fastq_files_filtered, and then stdout resulting
to the following command structure:
fastq_illumina_filter --keep [keep] -v -o $2 $1 > $3and for gzipped FASTQ files:
gunzip -c $1 | fastq_illumina_filter -v --keep [keep] 2> $3 | gzip > $2
All execution path are accessible using the method get_exec_path. This leads to the implementation of the following
process() function:
from weaver.function import ShellFunction
from ng6.analysis import Analysis
from jflow.abstraction import MultiMap

class QIlluminaFilter (Analysis):

    def process(self):
        if self.input_fastqs[0].endswith(".gz") :
            fastq_illumina_filter = ShellFunction("gunzip -c $1 | " +
                self.get_exec_path("fastq_illumina_filter") +
                " -v --keep  " + self.keep + "  2> $3 | gzip > $2",
                cmd_format='{EXE} {IN} {OUT}')
        else :
            fastq_illumina_filter = ShellFunction( self.get_exec_path("fastq_illumina_filter") +
                " --keep  " + self.keep + " -v -o $2 > $3 $1",
                cmd_format='{EXE} {IN} {OUT}')
        MultiMap(fastq_illumina_filter,
            inputs = self.input_fastqs,
            outputs = [self.fastq_files_filtered, self.stdout])
We want fastq_illumina_filter to itterate through the input files. For this we will use an abstraction: the MultiMap.
The abstraction must be called on the defined ShellFunction with inputs and outputs.
The stdout file will contain informations that can be presented to the user via the web interface. Those informations are the
number of processed sequences (Input) and the number of sequences after filtering (Output). A method __parse_stat_file() will
be used to retrieve those informations. The method _add_result_element(name, key, val, group) allows to add grouped informations to the database.
Here for each input FASTQ file, the number of sequences before and after filtering will be added to the NG6 database. All those operation
must be executed in post_process() method, since they must wait for the output files to be generated. This lead to the implementation
of the following post_process():
from weaver.function import ShellFunction
from ng6.analysis import Analysis
from jflow.abstraction import MultiMap

class QIlluminaFilter (Analysis):

    def post_process(self):
        for file in self.stdout :
            file_name = os.path.splitext(os.path.basename(file))[0]
            input, output = self.__parse_stat_file(file)
            self._add_result_element(file_name, "input", str(input))
            self._add_result_element(file_name, "output", str(output))

    def __parse_stat_file (self, stat_file):
        input, output = 0, 0
        for line in open(stat_file, "r").readlines():
            line = line.strip()
            input_reg = re.search("Input: (.*) reads", line)
            output_reg = re.search("Output: (.*) reads \(.*\)", line)
            if input_reg:
                input = input_reg.group(1).replace(",", "")
            if output_reg:
                output = output_reg.group(1).replace(",", "")

        return input, output
Two other methods must be overloaded, get_version() and define_analysis(), which respectivly give the version of the analysis and
describe the analysis parameters, name options and software. The global class definition for QilluminaFilter is the following:
import re, os
from subprocess import Popen, PIPE
from jflow.abstraction import MultiMap
from ng6.analysis import Analysis
from weaver.function import ShellFunction

class QIlluminaFilter (Analysis):

    def define_parameters(self, input_fastqs, keep="N"):
        self.add_parameter( "keep", "keep option for fastq_illumina_filter",
            default=keep, choices=["N", "Y"])
        self.add_input_file_list( "input_fastqs", "Input fastq files",
            default=input_fastqs, required=True, file_format = 'fastq')
        self.add_output_file_list( "fastq_files_filtered", "fastq_files_filtered",
            pattern='{basename}', items=self.input_fastqs, file_format = 'fastq')
        self.add_output_file_list( "stdout", "stdout", pattern='{basename_woext}.stdout',
            items=self.input_fastqs)

    def define_analysis(self):
        self.name = "QIlluminaFilter"
        self.description = "Filters FASTQ file generated by CASAVA 1.8"
        self.software = "fastq_illumina_filter"
        self.options = "--keep " + self.keep + " -v"

    def get_version(self):
        cmd = [self.get_exec_path("fastq_illumina_filter"), "-help"]
        p = Popen(cmd, stdout=PIPE, stderr=PIPE)
        stdout, stderr = p.communicate()
        return stdout.split()[2][:-1]

    def process(self):
        if self.input_fastqs[0].endswith(".gz") :
            fastq_illumina_filter = ShellFunction("gunzip -c $1 | " +
                self.get_exec_path("fastq_illumina_filter") + " -v --keep  " +
                self.keep + "  2> $3 | gzip > $2",
                cmd_format='{EXE} {IN} {OUT}')
        else :
            fastq_illumina_filter = ShellFunction( self.get_exec_path("fastq_illumina_filter") +
                " --keep  " + self.keep + " -v -o $2 > $3 $1",
                cmd_format='{EXE} {IN} {OUT}')
        MultiMap(fastq_illumina_filter,
            inputs = self.input_fastqs,
            outputs = [self.fastq_files_filtered, self.stdout])

    def post_process(self):
        for file in self.stdout :
            file_name = os.path.splitext(os.path.basename(file))[0]
            input, output = self.__parse_stat_file(file)
            self._add_result_element(file_name, "input", str(input))
            self._add_result_element(file_name, "output", str(output))

    def __parse_stat_file (self, stat_file):
        input, output = 0, 0
        for line in open(stat_file, "r").readlines():
            line = line.strip()
            input_reg = re.search("Input: (.*) reads", line)
            output_reg = re.search("Output: (.*) reads \(.*\)", line)
            if input_reg:
                input = input_reg.group(1).replace(",", "")
            if output_reg:
                output = output_reg.group(1).replace(",", "")

        return input, output
QIlluminaFilter template
To present the results of QIlluminaFilter analysis in the NG6 web interface, a template file must be written.
To be associated to an analysis, a template file must have the exact same name as the Python class name of the
analysis, so the template file for QIlluminaFilter will be named QIlluminaFilter.tpl.
This template has to be written using PHP Smarty paradigm.
The first thing to do while writing a template file for NG6 is to extends the default analysis template. This is done using the command
{extends file="AnalysisTemplate.tpl"}. Doing this provide you an empty template with default tabulations:
{extends file="AnalysisTemplate.tpl"}
To populate this template, the results block must be overloaded using the {block name="results""} instruction. An HTML table will be written.
Assuming that each input file used in QIlluminaFilter analysis represents a sample,
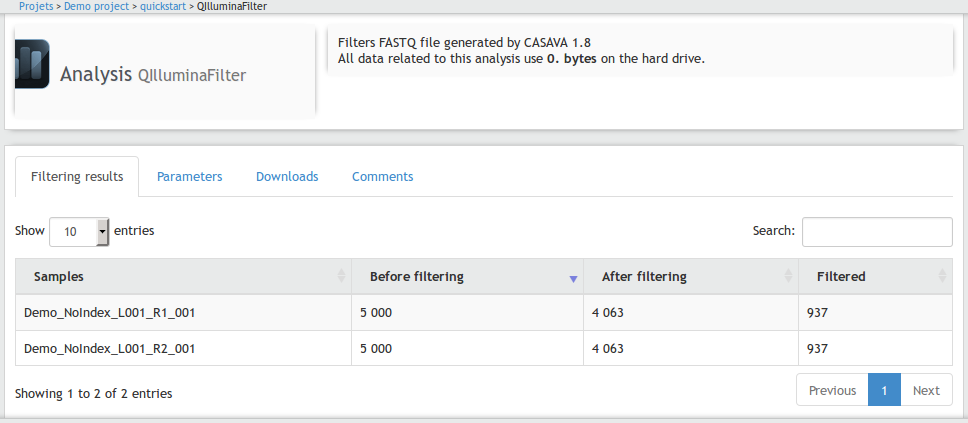
each line of the table will present the number of sequence before and after filtering and also the number of filtered sequences.
Attributes can be passed to a Smarty template. All the previously generated analysis results are available in $analyse_results
attribute. This attribute is a dictionnary which contains the results for each sample regrouped by the group, with the sample name as key.
In the Python class, we added our results using _add_result_element(sample, key, value, group). The value can be retrieved in
$analyse_results as $analyse_results['group'].key.
PHP functions can be used in a Smarty template. In the template the PHP function number_format() will
be used to format the number of sequences. The template looks like:
{extends file="AnalysisTemplate.tpl"}

{block name=results_title} Filtering results {/block}
{block name=results}
<table class="table table-striped table-bordered dataTable analysis-result-table">
 <thead>
  <tr>
   <th class="string-sort">Samples</th>
   <th class="numeric-sort">Before filtering</th>
   <th class="numeric-sort">After filtering</th>
   <th class="numeric-sort">Filtered</th>
  </tr>
 </thead>
 {assign var="analyse_results_sorted" value=$analyse_results|@ksort}
 <tbody>
 {foreach from=$analyse_results_sorted key=sample item=sample_results}
  <tr>
   <td>{$sample|get_description:$descriptions}</td>
   <td>{$sample_results["default"].input|number_format:0:' ':' '}</td>
   <td>{$sample_results["default"].output|number_format:0:' ':' '}</td>
   <td>{($sample_results["default"].input-$sample_results["default"].output)|number_format:0:' ':' '}
    </td>
  </tr>
 {/foreach}
 </tbody>
</table>
{/block}

{block name=download}{/block}
Once executed, the analysis will have the following layout in the web interface:
Step #3 Create QFastQC analysis
QFastQC analysis
FastQC aims to provide a simple way to do some quality control checks on raw sequence data. Several charts quality charts are generated. To make it as simple as possible, we will only focus on two of them: "Per base sequence quality" and "Per base sequence content". The executed fastqc command line looks like:
fastqc --extract --outdir output_directory input_file.fastq > input_file.stdout 2>> input_file.stderr
Where --extract tells fastqc to extract the generated pictures from its archive, --outpdir sets the output directory. input_file.fastq
is the raw sequence file that will be used. input_file.stdout and input_file.stderr are log files.
Splitting the command line into parameter will give the following parameters:
input_file: which will be the input file used to generate our repport.output_directory: which will be the working directory of fastqc.stdout: which will contain the standart output stream.stderr: which will contain the standart error stream.
By default, fastqc generates a file named input_file_fastqc.zip which contains several files (summary, images, etc...). Using
the --extract option will automaticaly extract the content of this file in a folder named input_file_fastqc, which
can then be browsed to retrieve images or parse generated informations files. This will lead to the following define_parameters() definition,
allong with the definition of the analysis class:
from weaver.function import ShellFunction
from ng6.analysis import Analysis

class QFastQC (Analysis):

    def define_parameters(self, input_files):
        self.add_input_file_list("input_files", \
            "Fastq file", default=input_files, required=True)
        self.add_output_file_list( "output_fastqc", \
            "outputs", pattern='{basename_woext}_fastqc', items=input_files)
        self.add_output_file_list( "stdouts", \
            "stdout", pattern='{basename_woext}.stdout', items=input_files)
        self.add_output_file_list( "stderrs", \
            "stderr", pattern='{basename_woext}.stderr', items=input_files)
The resulting command line should have the following structure:
[EXE] --extract --outdir [outdir] [input_file] > [stdout] 2>> [stderr]
This structure will be used to help us to build the command line.
As said before, NG6 provide multiple function (ShellFunction, PythonFunction) to build the comand line. Here the ShellFunction
will be used again. The ShellFunction takes 2 arguments: the command line structure, wich is required, and the cmd_format
defining the parameter ordering.
Considering cmd_format="{EXE} {IN} {OUT}", which is a classic value for this option, NG6 will consider the following
inputs and outputs order: input_file, stdout, and then stderr resulting
to the following command structure:
[EXE] --extract --outdir [outdir] $1 > $2 2>> $3
All execution path are accessible using the method get_exec_path. This leads to the implementation of the following
process() function:
from weaver.function import ShellFunction
from ng6.analysis import Analysis
from jflow.abstraction import MultiMap

class QFastQC (Analysis):

    def process(self):
        fastqc = ShellFunction( self.get_exec_path("fastqc") + ' --extract --outdir ' + \
            self.output_directory + '  $1 > $2 2>> $3 ', cmd_format='{EXE} {IN} {OUT}')
        MultiMap(fastqc, inputs=[self.input_files],
            outputs=[self.stdouts, self.stderrs, self.output_fastqc])
We also use again the abstraction MultiMap because we want fastqc to itterate through the input files.
self.output_fastqc is added as an output but will not be used in the command line. This must be done because the analysis
expect self.output_fastqc to be generated, and setting it as an output tells that this file will be generated by
the fastqc command.
When the process is done, the database must be updated with relevant informations to present to the user. We will need the
generated png image for "Per base sequence quality" and "Per base sequence content" as said before. The fastqc also gives us informations on
wheter those metrics FAIL or PASS. Those informations are available in a file called summary.txt, contained in each fastqc subdirectory.
To parse this file, we write a method named __parse_summary_file():
Now we can save our png files. The function _save_file() allows us to save a file to the storage directory. It also return the webpath of this
saved file, and then make it available in the template. The function _add_result_element() allows us to update the database with element for each
sample. Here a sample is defined by a fastq file. This method takes 4 arguments: a sample name, a key string, a value associated with the key, and an optional group
to group key values pairs. The default value for the group is "default".
from weaver.function import ShellFunction
from ng6.analysis import Analysis
from jflow.abstraction import MultiMap

class QFastQC (Analysis):

    def __parse_summary_file (self, summary_file):
        per_base_quality = ""
        per_base_sequence_content = ""
        for line in open(summary_file, 'r').readlines():
            parts = line.strip().split("\t")
            if parts[1] == "Per base sequence quality": per_base_quality = parts[0]
            if parts[1] == "Per base sequence content": per_base_sequence_content = parts[0]
        return per_base_quality, per_base_sequence_content

    def post_process(self):
        for output_fastqc_dir in self.output_fastqc :
            sample = re.sub( "_fastqc$", "", os.path.basename(output_fastqc_dir))
            per_base_quality, per_base_sequence_content = self.__parse_summary_file(
                os.path.join( output_fastqc_dir, "summary.txt" ))

            self._add_result_element(sample, "img",
                self._save_file(os.path.join(output_fastqc_dir, "Images", \
                "per_base_quality.png"), \
                sample + ".per_base_quality.png"), "pbqpng")
            self._add_result_element(sample, "result", str(per_base_quality), "pbqpng")

            self._add_result_element(sample, "img",
                self._save_file(os.path.join(output_fastqc_dir, "Images", \
                "per_base_sequence_content.png"), \
                sample + ".per_base_sequence_content.png"), "pbspng")
            self._add_result_element(sample, "result", str(per_base_sequence_content), "pbspng")
Two last methods must be defined: get_version() which will give us the version of the analysis, and define_analysis() which will
define the analysis. The global QFastQC class is now:
import subprocess, os, re
from weaver.function import ShellFunction
from jflow.abstraction import MultiMap
from ng6.analysis import Analysis

class QFastQC (Analysis):

    def define_parameters(self, input_files):
        self.add_input_file_list("input_files",
            "Fastq file", default=input_files, required=True)
        self.add_output_file_list( "output_fastqc",
            "outputs", pattern='{basename_woext}_fastqc', items=input_files)
        self.add_output_file_list( "stdouts",
            "stdout", pattern='{basename_woext}.stdout', items=input_files)
        self.add_output_file_list( "stderrs",
            "stderr", pattern='{basename_woext}.stderr', items=input_files)

    def get_version(self):
        p = subprocess.Popen([self.get_exec_path("fastqc"),
            "--version"], stdout=subprocess.PIPE, stderr=subprocess.PIPE)
        stdout, stderr = p.communicate()
        return stdout.split()[1]

    def define_analysis(self):
        self.name = "QFastQC"
        self.description = "Statistics on reads and their qualities. M"
        self.software = "fastqc"
        self.options = ""

    def __parse_summary_file (self, summary_file):
        per_base_quality = ""
        per_base_sequence_content = ""
        for line in open(summary_file, 'r').readlines():
            parts = line.strip().split("\t")
            if parts[1] == "Per base sequence quality": per_base_quality = parts[0]
            if parts[1] == "Per base sequence content": per_base_sequence_content = parts[0]
        return per_base_quality, per_base_sequence_content

    def process(self):
        fastqc = ShellFunction( self.get_exec_path("fastqc") +
            ' --extract --outdir ' + self.output_directory +
            '  $1 > $2 2>> $3 ', cmd_format='{EXE} {IN} {OUT}')
        MultiMap(fastqc, inputs=[self.input_files],
            outputs=[self.stdouts, self.stderrs, self.output_fastqc])

    def post_process(self):
        for output_fastqc_dir in self.output_fastqc :
            sample = re.sub( "_fastqc$", "", os.path.basename(output_fastqc_dir))
            per_base_quality, per_base_sequence_content = self.__parse_summary_file(
                os.path.join( output_fastqc_dir, "summary.txt" ))

            self._add_result_element(sample, "img",
                self._save_file(os.path.join(output_fastqc_dir,
                "Images", "per_base_quality.png"),
                sample + ".per_base_quality.png"), "pbqpng")
            self._add_result_element(sample, "result", str(per_base_quality), "pbqpng")

            self._add_result_element(sample, "img",
                self._save_file(os.path.join(output_fastqc_dir,
                "Images", "per_base_sequence_content.png"),
                sample + ".per_base_sequence_content.png"), "pbspng")
            self._add_result_element(sample, "result", str(per_base_sequence_content), "pbspng")
QFastQC template
Now we must write a template file for QFastQC analysis. This file must be named as the analysis class and placed in the right
directory. Our template will be named QFastQC.tpl. The goal of this template is to present the previously saved png files to the user
in the web interface. This template has to be written using PHP Smarty paradigme.
The analysis template must inherit a global defined template using smarty command {extends file="AnalysisTemplate.tpl"}.
The block {block name=results} {/block} must be overloaded with HTML content to presents the fastqc results.
We will write a table, and for each line in our table, we will present the fastqc results for one FASTQ file.
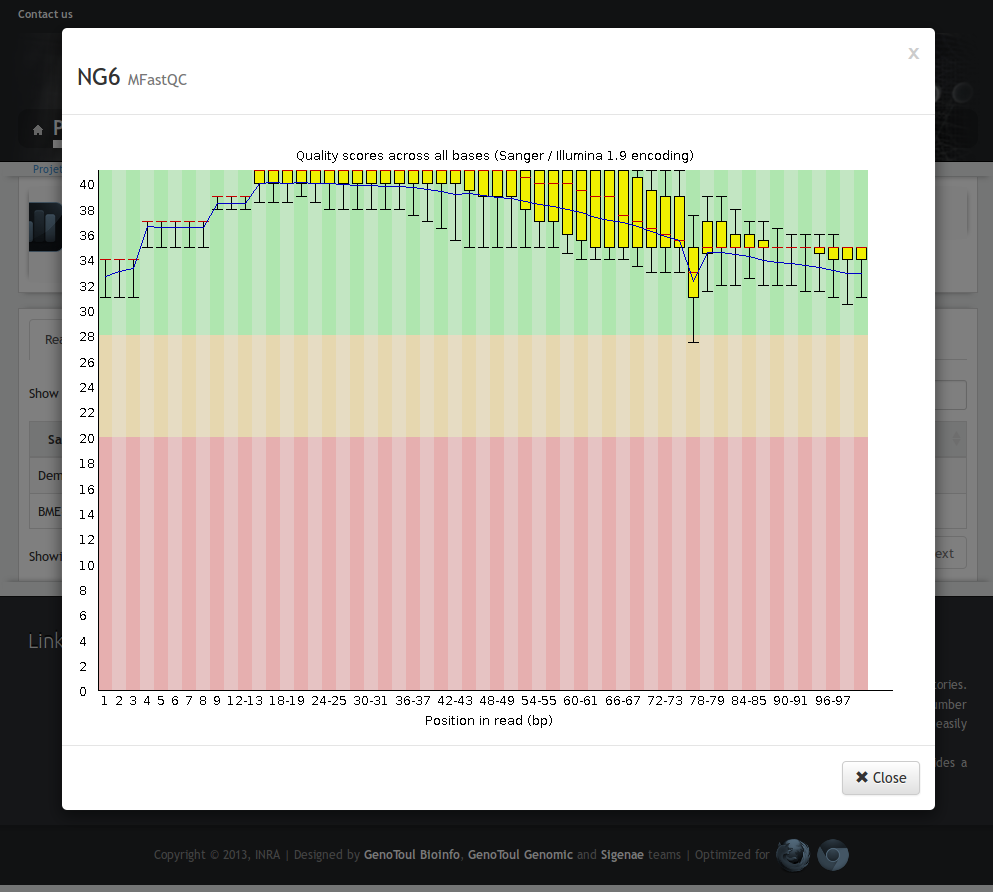
Each png file will be available by the click on a link. To do this, we will have to write a javascript file associated with the template.
This javascript will open a modal with an image when the user click on a link with the CSS class image-link. The image path
must be setted in tht href attribute of the link.
Attributes can be passed to the Smarty template. All the previously generated analysis results are available in $analyse_results
attribute. This attribute is a dictionnary which contains the results for each sample regrouped by the group, with the sample name as key.
In the Python class, we added our results using _add_result_element(sample, key, value, group). The value can be retrieved in
$analyse_results as $analyse_results['group'].key. The global template looks like:
{extends file="AnalysisTemplate.tpl"}
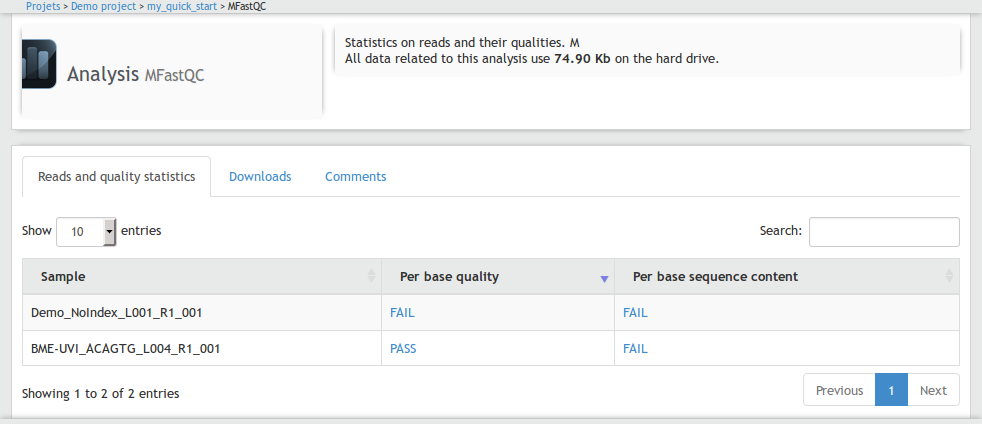
{block name=results_title} Reads and quality statistics {/block}
{block name=results}
<table class="table table-striped table-bordered dataTable analysis-result-table">
<thead>
<tr>
<th class="string-sort" >Sample</th>
<th class="string-sort" >Per base quality</th>
<th class="string-sort" >Per base sequence content</th>
</tr>
</thead>
{assign var="analyse_results_sorted" value=$analyse_results|@ksort}
<tbody>
{foreach from=$analyse_results_sorted key=sample item=sample_results}
<tr>
<td class="sample_name">{$sample|get_description:$descriptions}</td>
<td><a class="imglink" href="{$sample_results['pbqpng'].img}">
{$sample_results["pbqpng"].result} </a></td>
<td><a class="imglink" href="{$sample_results['pbspng'].img}">
{$sample_results["pbspng"].result} </a></td>
</tr>
{/foreach}
</tbody>
</table>
{/block}
The javascript file associated with the template must also have the exact same name as the Python class name of the analysis.
This file, created next to QFastQC.tpl will be named QFastQC.js. The jQuery library is available in
all template javascript file. We will use this library to write our javascript file:
$(function () {

    $(".image-link").click(function() {
        var img_href = $(this).attr('href') ;
        var imgLoad = $("<img />")
            .attr("src", img_href)
            .attr('alt', 'Cannot display')
            .unbind("load")
            .bind("load", function () {
                var imgwidth = ( this.width > 900 ) ? 900 : this.width ;
                resize_center_btmodal('#ng6modal',imgwidth + 50 );
                $("#modal-label-tmpl").html("NG6 <small> " + $("#analyse_name").val() + "</small>");
                $("#modal-body-tmpl").html('<div id="img_container" '+
                   'style="overflow-x : auto"><img src="' +img_href+ '" alt="Cannot display"></div>');
                $("#modal-foot-tmpl").html('<button class="btn btn-default" ' +
                   'data-dismiss="modal" aria-hidden="true">' +
                   '<i class="glyphicon glyphicon-remove"></i> Close</button>');
                $("#ng6modal").modal();
            });
        return false;
    });

});
All analysis template files have access to a bootstrap modal (dialog box/popup window) with the id ng6modal.
This modal is shown using $("#ng6modal").modal();. It also has 3 main parts that can be selected
and updated, each part with a uniq id:
modal-label-tmpl: updating this element will update the label of the modal.modal-body-tmpl: represents the main content of the label.modal-foot-tmpl: represents the footer content of the label.
This will give us the following interface, a click to a link will display the desired png:
Step #4 create the workflow
Now that the analyses have been written, the quickstart NG6Workflow will be created to link those analyses together.
A NG6Workflow is a Python class defined in a __init__.py file in the workflows package. This class must inherit from
ng6.ng6workflow.NG6Workflow class, and must overload several methods (more info here):
get_description()to give a description to the workflow in the command line and in the interface.define_parameters(function="process")to define input parameters of the workflowprocess()to define the workflow execution by linking components
The get_name() method can also be overloaded to change the call name of the NG6Workflow.
Overloading NG6Workflow will automaticaly provides the class with default parameters for the description of a run and parameters to define samples and input files.
The analysis QIlluminaFilter has a keep parameter. To make it available in the command line and in the web interface,
it will be added in define_parameters(). The skeleton of the class is:
from ng6.ng6workflow import NG6Workflow

class QuickStart(NG6Workflow):

    def get_name(self):
        return 'quickstart'

    def get_description(self):
        return "Quick start pipeline"

    def define_parameters(self, function="process"):
        self.add_parameter( "keep", "keep option for fastq_illumina_filter",
            default="N", choices=["N", "Y"])
The process method is used to add analyses and components and link them together to make the workflow. To add a component or an analysis, use the function
add_component(), which takes as first argument the name of the Python class of the component or analysis to be added, and the second argument which
is an array of parameters that have to be used as input parameters for the analysis/component. This method also have a parent argument that can be passed to
specify the parent analysis. This will result in a tree view in the web interface.
The QIlluminaFilter analysis takes as input a list of FASTQ files and produces as output a list of FASTQ files. The QFastQC component
will take those output files as input, thus linking the two analyses together.
NG6Workflow has many utilie methods, one of them get_all_reads() allows to retrieve all input files provided. The workflow definition is the following:
from ng6.ng6workflow import NG6Workflow

class QuickStart(NG6Workflow):

    def get_name(self):
        return 'quickstart'

    def get_description(self):
        return "Quick start pipeline"

    def define_parameters(self, function="process"):
        self.add_parameter( "keep", "keep option for fastq_illumina_filter",
            default="N", choices=["N", "Y"])

    def process(self):
        illumina_filter = self.add_component("QIlluminaFilter", [self.get_all_reads()])
        fastqc = self.add_component("QFastQC", [illumina_filter.fastq_files_filtered],
            parent = illumina_filter)
Step #5 test your workflow
A nG6 workflow can be run from the command line (ng6_cli.py) or via the server (ng6_server.py). From your install directory enter
python bin/ng6_cli.py -husage: ng6_cli.py [-h]
[...]
Available sub commands:
{rerun,reset,delete,execution-graph,status,quickstart,myquickstart}
[...]
quickstart Quick start pipeline
[...]A new line with "quickstart" should be displayed! Run it on your own data. An example could be:
python bin/ng6_cli.py myquickstart --project-name "Demo project"
--name "my_quick_start" --description "quick start" --data-nature "DNA" --sequencer "Unknown"
--species "test" --type "quick start" --sample read1=/path/to/sample1_file.fastq.gz
--sample read1=/path/to/sample2_file.fastq.gz --admin-login <login>
Our quickstart workflow inherit from NG6Workflow class which inherit from BasicNG6Workflow class, so it also inherit of required arguments which are :
--project-name, --name, --description, --data-nature, --sequencer, --species, --type, --admin-login and at least one --sample
The quickstart workflow is already implemented in the NG6 sources.